|
How to Build Your Own PC (Page 5/9)
|
Posted: September 09, 2002
Written by: Chris Angelini
Step Four: Giving Your Motherboard a New Home
| Drink Tip!
"The Big Blue Banana" is an even mixture of Pepsi Blue and Cruzan’s Banana Rum, invented by Chris.
|
Since the motherboard now houses a processor and memory, it can be installed in the already-been-prepped case. Line up the mounting holes with the copper spacers and use the included screws to mount the board. Now that your custom machine is taking shape, it may be a good time to step back for a break. Relax, meditate, take some pictures, watch Friends, or have a Big Blue Banana.
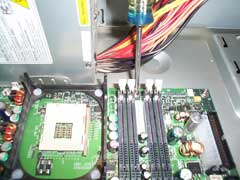
Click to enlarge.
Step Five: Prepare the Cables
| Tweak Tip!
When you’ve finished installing your cables, tuck them in the unused drive bays for a clean installation.
|
Most motherboards include two IDE cables and a floppy drive connector. While the interior of the case is still clean (thus reasonably accessible), attach the cables to the motherboard. Note that one end of the cable has two connectors close together – this end attaches to your IDE device of choice, while the other end goes to the motherboard. Each cable should be marked with a red wire to indicate Pin 1. It is imperative to match Pin 1 on the cable with Pin 1 on the motherboard and again with Pin 1 on the hard disk drive or CD-ROM.
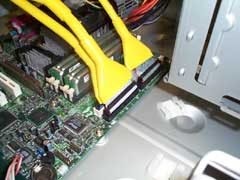
Click to enlarge.
Conventional IDE cables are fine for the most part, but in the interest of cleanliness, we’ve developed a soft spot for round cables. Not only do these cables take up less room, but they are also easier to tuck away, promoting better air flow throughout your case.
Next Page
|
|