 |
|
|
|
In the Forums... |
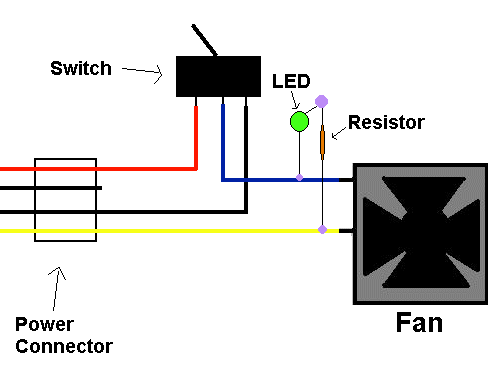
Posted: January 20, 2000 Written by: Dan "Tweak Monkey" Kennedy Stage 1: Shut The FANS Up! (Fan Switches) This modification is optional. If you don't really care about it, go ahead and skip to the next page for different tweaks.  Just like a 5" exhaust tip and 747 wing, racing stripes are optional. If you really want to impress your fellow computer friends (or the techie-ladies out there), you should install some switches to toggle the louder fans inside your case. Don't worry... it's not really all that bad. It'll cost you between $5 and $20, but it's well worth the money. When you want to go to sleep but you don't want to hear those stupid fans, you can just flip a switch and turn them off. Or you can turn the switch the other way to run the fans at HALF power. Very handy for the times when you need cooling but you don't want the noise. Okay, okay! I'll explain. First, head down to the local Radio Shack (or whatever fits your needs) and buy the essential items. Pick up a few two-way toggle switches, 500 ohm resistors, a couple LEDs (the spiffy blue ones if you're wealthy), holders for the LEDs, and some good wire if you don't have any. The LEDs (along with the holders and resistors) aren't necessary, but they really complete the look. The only tools you really need are a drill, a soldering iron, wire clippers, electric tape, and about 30 minutes. You might also need tin-snips.  The common parts for this little project shouldn't even run $20. Drill a couple holes in the front of the case if you're going to have lights. The holes should be the same size as the LED holders' inner casing. The LED holders come apart, and firmly attach into these holes using the outer casing of the holder, which should be a little larger than the holes.  See the cute little holes with green LEDs? Easy. 2) Drill Holes to Mount Switches Once you've drilled holes, you'll need to find a way to mount the switches. Usually, an empty 3 1/2" bay will do just fine. Simply remove the plastic cover and drill or cut holes out for your switches. Since it's not always that simple, here are a couple pics showing what we did...  Cut away metal if it's blocking the switches.  Drill holes into the plastic bay cover.  Install the switches into the plastic. Notice the LED holders' location... 3) Wire the Switches Into the Fans This is a big step, but it's easier than it seems. To start with, label the different wires and indicate which fan they are going to connect with. Also, make sure that when you wire it up, anything AFTER the switch is meant to be turned on or off. You don't want to split the power connector coming OFF of a switch unless you want that one switch to control both of those items! Here are the basic schematics to wiring a single switch. Big shouts out to Cliff's Fanbus for the basic schematics!  The purple circles are solder points where wires must be soldered to connectors. As you see, one prong from the LED goes to the resistor, and the other goes to the ground wire (Yes, that blue wire is a ground wire that goes from the black (ground) wire on the fan to the MIDDLE prong on the switch). The other side of the resistor should be put into the yellow power wire. If you don't plan on using lights, simply remove the resistor and light from the setup. Now if you flip the switch one way, you get a 12v fan connection (full power) and if you flip it the other way, you get 7v, so it's about half as fast (and much quieter). The middle switch position turns the fan off. 4) Two or Three Switches Things get a little messy if you use more than one switch. If you're really interested in doing this, either use a connection for each and approach it the same way as you did one switch, or look at Cliff's Fanbus for some other ideas.  It ain't pretty on the inside, but it works great! |
||
|
| |||
|---|---|---|---|