Introduction
Building a small network for a few computers is easy and cheap, and makes gaming much more enjoyable and virtually lag free. File transfers become much easier than running Zip/floppy disks back and forth, and you can even split your Internet connection between a couple PCs. One of my favorite features is sharing printers, which makes it much easier (and cheaper) than using separate printers. Windows 95 and 98 make the task of setting up a network pretty simple. The hardest part is probably driving down to the store and buying a couple of cards and physically wiring it all together. There are a few different options you can go with when deciding what type of network you want. This is a guide for those of you who have two or more computers sitting around, and would like to have a LAN but don't really know how, or you might be intimidated by them. It's really quite simple, as you'll learn.
10 or 100 mbps?
There are two basic speeds you can go with for normal networks, 10 and 100 mbps (that's megabits per second, not to be confused with megabytes per second). 10 mbps will provide more than enough bandwidth for gaming and is adequate for sending files back and forth, however if you're the kind of guy who regularly drives 300mph on the freeway, 100 mbps networks are substantially faster for file transfers, and won't leave you waiting forever. But 100 mbps does cost more, though, so you have to balance price and performance, as with everything else in life.
Network Type
If you've decided to go with 10 mbps, you have another decision waiting: 10Base2 or 10BaseT.
10Base2:

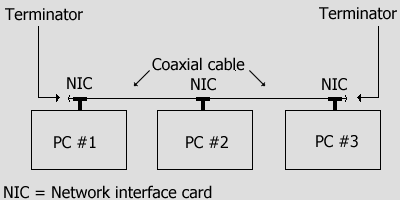
10Base2 uses coaxial cable to connect the two cards. The upside to this is that you don't need a hub, so it costs less, but you'll be stuck at 10 mbps. You'll need the cable, a T-connector for each card (which should come with the card anyway), and terminators for each end of the line. The obvious advantage of a 10Base2 is the price. A hub could set you back a bit, so this will save some money.
10BaseT:

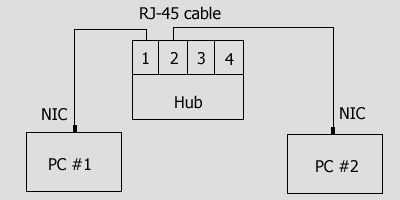
10BaseT uses a hub and RJ-45 cables to connect to the interface cards. If you buy 10/100 mbps cards, which don't cost that much more than 10 mbps cards, you'll be able to upgrade to 100 mbps in the future, once the price for fast hubs drop. This is usually the preferred way to go, since a small hub is usually about $30 and the cards should be around $20 each for a cheap brand. You'll need RJ-45 cable to connect each card to a port on the hub. When you pick up a hub, consider how many computers you may have plugged into your network at a time. If you don't have plans to have any huge LAN parties or you don't want to add too many PCs, don't spend the extra cash for anything bigger than a 5-port hub. If you do want to host large LAN parties or you want to load all the PCs you can fit onto your network, do it right the first time and buy a big hub.
If you're going with 100 mbps, you'll use 100BaseT, which works exactly the same way as 10BaseT, except your hub will cost more and you'll need CAT-5 cable, which you'll probably get anyway. You will also need 100 mbps cards.

Sometimes network starter kits like Linksys's Fast Ethernet Network Starter Kit are a good way to get started and often times cost even less than buying all the materials separately. These kits package two or sometimes three NIC cards, cables, and a hub. Make sure to read the boxes and ensure that you are buying what you want. (e.g. PCI, not ISA)
Shop around and try finding a good price for the equipment. A good place to look is Pricewatch for some bargains.
Hardware Installation
Luckily the installation of a small LAN is very easy and fast. First, shut down Windows. Then remove the chassis/case cover and insert your PCI or ISA NIC (network interface card). Firmly press the cards into place and put a screw in there so it stays put.

For 10Base2, plug a T-connector into each card. This should have been included with your network gear. Connect a coaxial cable from one side of one card to one side of the other card, then pop terminators onto the ends that are left open. Follow this procedure for all of the machines you are going to include in your LAN.

For 10BaseT and 100BaseT, first plug the hub in to an outlet and mount it on a secure surface. Next, connect the RJ-45 cables from each card on each PC to a port on the hub. For best results, connect them in incremental order (1,2,3, and so on).
There should be at least one light on each card, and the hub if you have one, that should come on when you turn the computers on. If they don't, the card is not getting power or it is not cabled right. Make sure the connections are in all the way, and ensure that the hub is actually on, if you have one. If it still doesn't work, your cable might not be made right, or one of your cards or hub might be dead.
When you are deciding where to put your hub, make sure you consider that the hub will most likely become very hot during usage. For this reason, keep it close to a window or a vent (or something) and place it away from anything that may be damaged.
Software Installation and Setup
The first step to configuring your network is installing your network cards for each machine. After you have made all the connections mentioned, power on your computer and verify that Windows boots up properly. You should be prompted because new hardware is found. Insert the driver disk included with your network cards if necessary. After this process is completed, reboot your PC. If your card is not detected correctly or it refuses to install, try disabling Plug and Play in your BIOS setup. When I first installed the Linksys Fast Ethernet Starter Kit I was required (on my old P2 266 system) to disable plug and play and have Windows redetect most of my hardware. It was a hassle, but it works now. Consult your motherboard manual for further information.
Once you're sure that your network cards are installed correctly and Windows is functioning properly, go into the Control Panel (Start, Settings, Control Panel) and choose Network. You will see a list of the installed protocols. Look for IPX, TCP/IP, Client for Microsoft Networks, and File and Printer Sharing for Microsoft Networks. If these are not present, you will need to install them.
To add IPX or TCP/IP, click the "Add" button. Choose Protocol, then Microsoft. You will see the options for IPX and TCP/IP.
To install Client for Microsoft Networks, choose Add, then Client, then Microsoft, then choose Client for Microsoft Networks.
To add File and Printer Sharing for Microsoft Networks, choose Add, then Service and you will see it.
Installing any of these will most likely prompt you to insert your Windows CD, then reboot your computer. They should bind to your network card automatically. Click the File and Print Sharing button below the listed protocols. If you wish to use your printer with both machines and share files back and forth, check both of these boxes. You may also need to give each computer a unique name so that you can tell them apart. It doesn't matter what you call them, just make them different.
Head back into the Network Control Panel. Double click the "TCP/IP -> [insert NIC card name here]" protocol. Go into the TCP/IP tab for your network card, and under the IP Address tab, click "Specify an IP Address". Each computer will need its own IP, but make sure to only change the last number, otherwise they'll end up on different subnets which could complicate things. A good range to use is 192.168.0.xxx (1, 2, etc). Don't just throw something in there, because it needs to be in a range that won't interfere with the rest of the Internet (since the 'net uses IPs too). The 192.168 range is set aside for private networks. If you experience other problems, try setting the Subnet Mask to 255.255.255.0.

Reboot, cross your fingers, and once they all come up, double-click Network Neighborhood on one of the desktops, and you should see the computers on your network. If nothing comes up, wait about 10 seconds and hit F5 to refresh. If this doesn't work, you can manually add users to your list by typing \\[Username] at the top next to address. E.g. you could type \\tweak3d if your login name was tweak3d. If nothing still happens, and you're sure the network cards are working, remove what you added and try again. You may have to repeat all the steps mentioned above. Don't give up hope: it'll work eventually.
Once you can see the other PCs over Network Neighborhood, test TCP/IP by going to a DOS prompt (Start, Run, command [then hit enter]), and type "ping " (example: ping tweak3d) Note: don't ping yourself, it won't do you any good.
If you get replies, good job. If you don't, but you can see the computer in Windows, make sure TCP/IP is bound to your network card in the Network Control Panel applet by checking the properties of the TCP/IP tab.
Once you can see between the two systems, you'll be able to try lots of new things, like play games with your other PC. When launching a game, there will usually be a series of options that indicate a LAN game. If you can, use IPX or "LAN" for the game. If your cannot find these, TCP/IP can be used. Simply connect to the assigned IP address of the other computer (e.g. if you assigned your other computer the IP 192.168.0.1 you would connect to that address) or you may even be able to connect to the computer's name. For example, in Half-Life you could specify the IP address of the server and type tweak3d in place of a number address.
Sharing
One of the most useful things to do on a network is access directories and printers of the other computers. To do this, you must have the other computer's folder or drive set as "shared."
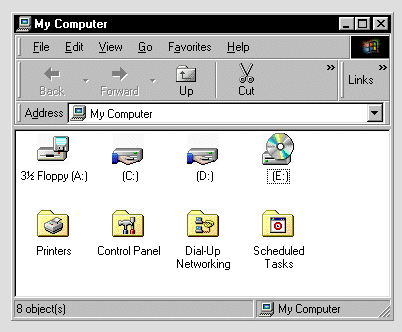
To specify which drives, folders, and printers are shared, enter My Computer on your desktop. Right click the drives or folders you wish to share and choose "Sharing". You will now have several options to configure how the drive/folder is shared. To share a printer, enter the Printers folder under My Computer. Right click your main printer and choose "Sharing". You will again have options for sharing. Now you must head over to the machine without the printer physically attached, and choose "Add Printer" from the Printer directory under My Computer. Choose Network Printer, and it should bring up your printer. Try printing a test page from the remote machine to ensure it's working properly.

Shared folders and drives have a blue hand holding them up. If you don't see a hand, your drives probably aren't shared.

Sharing CD-ROMs and floppy drives can lead to trouble. If the other PC tries to access your floppy drive and there isn't a disk in it, you'll have to hear that great grinding noise. Ugh.
To access shares from another computer, you can double-click the computer name under Network Neighborhood to get a list of everything that computer is sharing, or you can click Start, Run, and type:
\\computername\share
(if you know the name of the share you want to access, of course). You can also specify directories. If I shared my entire C: out and wanted to access my desktop, I could type \\tweak3d\c\windows\desktop at the Run prompt.
Sharing Considerations
Sharing is a very cool feature and it is definitely one of the best reasons to setup a LAN. However, make sure that you take a few precautions when sharing files and directories:
You definitely need to put passwords on your shared drives. Why? There are several ways to connect to shared drives on ANYONE's computer as long as they're on the Internet and they've got TCP/IP installed. I don't want to encourage people to do this, but rather encourage people to protect their systems... therefore I will describe how this works and why it's considered insecure (and put bluntly: stupid).
Programs like ScanIP can be used to scan a huge series of IP addresses on the Internet. In addition to scanning addresses, it will show you if the users have drive sharing enabled. If they do have drive sharing enabled, it will let you connect to their drives! Luckily, a password will stop them in their tracks. And yes, it works. I have tried it on my other PC and it lets me connect to as long as I turn off the sharing password on the PC. Once you're connected, you can do whatever is specified by the sharing (read, write, etc.). You can delete, copy, rename, edit, and even upload. So please, for your own sake, put passwords on your system!
Want to make sure your system is secure? Go here and test it out!
What Else?
Even though you gave each computer an IP, you won't be sharing your Internet connection across the network. To do this, it is highly recommended that you download and install SyGate. This program is one of the most simple and effective programs for splitting your Internet connection. Provided you followed the steps above, you will most likely not need to configure anything. If you do have problems getting Sygate to work, install it in server mode on the PC with the Internet connection and install it in client mode on the other PC(s). Choose auto configuration and everything should work great.
If you're using 10BaseT, you might look into a hub-card. This is a type of network card that also functions as a hub - it has 4 or 5 ports on the back of it. This could reduce the price by $15 or so, and you'll have one less cable, but there's an important consideration: your network will go down when the machine with the hubcard is off, since hubs need power. These cards function exactly like normal network cards, though, so there's no compatibility problem.
Conclusion
Home networks are a huge convenience if you have computers scattered around your house. You can play games from the CD-ROM downstairs, or let your parents check their e-mail without kicking you off of the only computer with Internet access. After some hassle to begin with, your network should run smoothly, and you'll have something new to brag about, too.
Want to put this guide on one, printer friendly page? Click here!
Want to return to the normal guide? Click here!
All Content Copyright ©Dan Kennedy; 1999


