Rune Tweak Guide
Posted: November 3, 2000
Written by: James Kennedy
Introduction
Now you can make that once-empty threat of beating someone to death with their own limbs a reality. While to some Rune is nothing more than just a simple hack n' slash gore fest, no one can deny the game's sense of adventure and playability. The only problem is that the game seems to run choppy on even some of the best of machines. This Unreal engine-based game is much like the others needing that little bit of attention to run just right. While this guide isn't totally different from our Deus-Ex and Unreal Tournament guides, there are enough differences to have you decapitating smoothly in no time.
Installation
Unfortunately, Rune doesn't have a lot of options when installing. You can go with a minimum install and just install the game itself, and read the maps, speech etc. from the CD, or you can install all the game content to your hard drive. I recommend installing the game content to your hard drive as it can drastically improve performance and load times. The only downside to this is that you MUST install all game content to the hard drive. You don't have the luxury of loading maps off of your hard drive and speech off of your CD-ROM so if you don't have enough disk space this can be rather frustrating. As usual, you should check to make sure your version of DirectX is up to date. The Rune CD is packed with the latest DirectX 7.
Drivers/Patches
As always, you should have the latest stable manufacturers' drivers installed. New video card drivers should be used for speeding up rendering and assuring compatibility, and new sound card drivers should be used to make sure your CPU isn't being strained any more than it has to be. Sometimes it is the smallest things that offer the biggest performance boosts.
Another important thing to do is to check for game updates. Patches don't always fix bugs but often times add features as well. The latest patch for Rune (version 1.01), which you can download here, fixes a number of bugs along with offering an updated Glide driver.
Video Settings
These are probably the most important settings to tweak in the entire options menu. Not only do they affect performance greatly but also they control the look of the game. These tweaks can be accessed in the Options menu.
Video Driver
This selects which renderer you would like to use for the game. The most important aspect of this setting is determining which device is fastest for your computer. If you are using a 3dfx chipset, choose the Glide renderer, as it is fastest. If you are using a different chipset I'd recommend using the Direct3D setting as the OpenGL renderer seemed much slower and more buggy.
Resolution
The general rule for resolution is that the higher the resolution, the sharper the image. This usually comes with a tradeoff in speed, however. I would recommend a lower setting for optimal speed. Try to find a resolution that gives you acceptable performance.
Color Depth
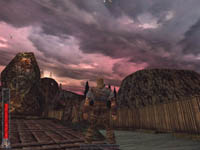
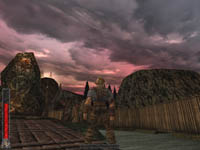
The two usual choices are here, 16-bit and 32-bit color depths. Using 32-bit color will give you a prettier picture but you will usually take a significant hit in performance. 16-bit color will usually be faster but not quite as nice looking. I use 16-bit color on this game because it runs so much faster and save for a few banded textures, I really can't see much of a difference. Here's a screenshot comparison showing the two. 16-bit is on the left, 32-bit on the right. Click to enlarge.
World Texture Detail
World texture detail controls the texture quality for the level. At a high setting the textures are very crisp and detailed while at the lowest setting the textures seem blurry and less detailed. I would recommend using a medium setting, as it is faster than high while still pretty nice looking. The one on the left is at the high setting while the one on the right is on the low setting.
Skin Detail
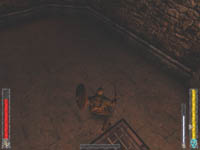
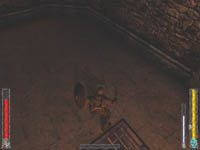
Skin detail controls not only the skin of the player character but also the skins of all the enemies and some of the map objects. As you can see below, turning this down all the way gives you very muddy and ugly textures, although it does give a nice speed increase. The high setting shows some very beautiful textures but is a little slower. The medium setting seems like a good idea here (once again) as it still doesn't sacrifice much detail, while still performing well.
Brightness
While it doesn't affect performance, the brightness setting affects how dark or how light your game looks. If it is too dark or too light, turn it to the right or left accordingly. This game is kind of on the dark side so I slide it more to the right.
Video Settings (cont.)
Mesh Complexity
Mesh complexity controls how detailed the player character, the enemies, and a few map objects are. Turning this down should give you a speed increase as the game has fewer polygons that it must render in each frame. For whatever reason, this option didn't speed the game up for me, but your results may vary. You can turn it all the way down to 0 but then the characters are just a mess of polygons.
Player Shadows/Actor Shadows
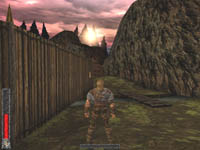
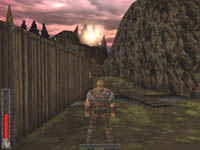
This setting controls the detail level of the player character and also the enemies' shadows. Setting this to projected shadows gives you a big hit in speed, but gives you a much more accurate and cooler looking shadow. I'd recommend setting this to blob shadows, as it is quick while still displaying a simple shadow, which makes it easier to time Ragnar's jumps and get a general feel of your orientation. I took screenshots to illustrate the difference, Projected is on the right while Blob is the the left.
Show Decals
Decals are the little extras you see while playing Rune, such as Ragnar's footsteps while he walks or jumps in certain areas, or the marks that weapons make on the walls. Turning this off gives a little speed boost, and after a while you won't even notice that it is off.
Fractal Animation
This controls the animation of the water textures and other liquid textures. Turning this off didn't really give me much of a speed increase. Another concern I had with turning this setting off is that it didn't seem to turn the animation off for all of the liquids - just a select few. I just leave this one on.
World Lighting
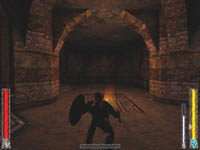
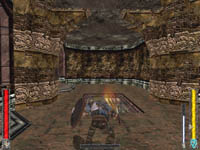
If you turn world lighting off, the whole level becomes void of any shadows, and appears filled by one generic light. It runs much quicker turning this off but I wouldn't recommend it unless you really need the extra speed as it makes the game look horrible. Here are a few shots to illustrate the vast difference. World lighting is on in the left picture while off on the right.
Dynamic LIghting
No matter what I tried I couldn't see a benefit from turning this off or on. The setting didn't seem to do what it implied which is to take away the dynamic lighting on characters and enemies in either OpenGL or Direct3D mode. Just leave it on; I did, and didn't notice a speed difference either way.
Audio Settings
Now we will move on the audio settings. There are a few tweaks here that can really affect performance.
Sound Quality
Turning sound quality to high will give you higher quality sounds and voices, but will of course be slower (more CPU and memory intensive) than the low setting... I usually set this to the low setting as you can't really notice too much of a difference between how low and the high settings for sound.
Use 3D Audio Hardware Card
Turn this on if you have one of those new fangled 3D sound cards, but you may take a performance hit. If you don't have a 3D sound card then don't even bother, as the CPU hit really isn't worth it.
Surround Sound
If your hardware supports it, you can enable Surround Sound for some superior sounding game sounds and music. This too can be CPU intensive depending on your decoder card, and if you don't have the proper hardware it can make the game sound horrible so use with care.
Game Settings
There are a few settings in this section that can affect performance, although nothing critical.
Gore Level
The gore level is the amount of blood and guts that spills from an enemy or from yourself should you happen to die. Just like in other games, turning this to a lower setting will be quicker, especially if you are involved in a huge massacre of enemies, which happens so often in Rune.
Pain Flashes
Although this doesn't really affect performance, I thought it might be worth mentioning. Pain Flashes occur when you take damage of any kind. I would recommend leaving this on because if you don't pay attention to your HUD as much as you should (like myself) then you can take damage sometimes and not even realize it. By leaving this on, the whole screen will flash when you take damage causing you to take note.
Amount of Debris
This setting controls the amount of debris that is generated whenever you destroy an object such as a barrel or a wall. Turning this down will speed things up a little bit, but really only until the object disappears.
Advanced Options
You can get to the advanced options by going to the game settings tab in the options menu and clicking the "advanced options" button or by enabling the console by pressing the tilde (~) key and typing preferences.
The first setting we will talk about is under the advanced section of the advanced options menu. Go to the game engine settings and look for "CacheMegSize". It should have a value of 4 . In effect, this is how much RAM that your computer sets aside for Rune. If your hard drive doesn't swap a lot during game play you can leave this setting alone, however if you are experiencing a lot of swapping, feel free to experiment with it a little until you find a setting that is good for you. Another good idea might be to check out some of the many tweak guides here at Tweak3D for optimizing memory/hard drives.
Go to the audio section next, and go to the "OutputRate" setting. The output rate will be 22050 Hz by default, and you can set it even lower, at around 11025 Hz for even higher performance. Next up is the "EffectsChannel" setting, which is defaulted at 16. If you are planning on using 3D hardware sound then don't change this, otherwise you can lower a little for a slight boost if you'd like. Turn "UseCDMusic" to true and "UseDigitalMusic" to false to save some CPU time and to have slightly better sound. Leave "UseReverb" off along with "Surround" unless you can afford the CPU power/memory. I got some decent speed increases modifying these sections.
Next we will go to the display section. The first setting we will talk about is the "CurvedSurfaces" setting. I noticed no graphical benefit from turning this on, so you are better off just leaving it alone.
The next setting is the "LodPercentage" settings. This setting controls the distance in which the level of detail models are employed. The higher the percent, the further away they change. It is set to 100 percent by default, but you can lower it a little for bit of extra speed. I wouldn't make it too low though as at lower percentages it can make the meshes look pretty bad even up close.
Another little option that many people neglect is the timedemo option. This is very handy when testing tweaks or benchmarking, as it tells the frame rate. To enable timedemo mode in order to check your frame rate, hit ~ to bring down the console within Rune and type timedemo 1. Hit enter and you should be good to go...
Conclusion
Well that's it for my first tweak guide. I hope you find these tips useful, I know I did. If you have any suggestions, corrections or ideas, feel free to email me and let me know what I can do to improve it.
Want to return to the normal guide? Click here!
All Content Copyright ©Dan Kennedy; 1998-2000