Win9X Hard Drive Tweak Guide
Posted: February 29, 2000
Written by: Keith "Farrel" McClellan
Introduction
Having hard drive and memory tweaks in the same guide seems like an odd marriage, but believe it or not, they overlap in quite a few ways. Hard drives have a feature commonly referred to as DMA, or direct memory access. Your system's RAM partitions out part of itself for its VCache, or virtual cache, in which it keeps data from the hard drive. And the hard drive itself can actually "become" RAM when it's used for Virtual Memory. Suffice it to say, these topics fit together so well that it is almost impossible to separate them out, so why bother trying?
Note: These tweaks are written with Windows 98 and above in mind. If you are running Windows 95, be even more cautious than usual.
Direct Memory Access
DMA is one of the biggest tweaks you can do for your Hard Drive and Memory subsystems, because it allows the computer to circumvent the CPU when loading data into memory from the hard drive. Before continuing with these tweaks, however, be forewarned that enabling DMA on a drive that doesn't support it is very dangerous, so unless you are SURE that DMA is supported, forego these tweaks. It should be pointed out that just about all 5400 and 7200-rpm hard drives, and even many lower speed drives, support DMA.
If you are unable to get the appropriate information off of the manufacturers website, check out Windows-help.net, which includes several tests to determine DMA compatibility.
Within the BIOS, make sure your hard drive is configured to Master (if possible) and that any supported UDMA settings are turned on. If you aren't sure if your hard drive supports UDMA (or your BIOS doesn't have the setting), try out the settings first using TweakBIOS. This program may also help you configure your hard drive when used on an overclocked system (covered later in the guide).
To enable DMA within Windows 9x, go to the Control Panel / System applet (Start -> Settings -> Control Panel -> System) and go to the Device Manager tab. Under the Disk Drive subheading, choose the listing of your hard drive and open it by double clicking on it. Go to the settings tab and make sure that DMA is enabled. To make sure that DMA doesn't cause any internal Windows conflicts (assuming the drive supports DMA), you are going to need to add these lines to the Mshdc.inf file at the bottom of the [ESDI_AddReg] tag (if they aren't already there):
HKR,,IDEDMADrive0,3,01
HKR,,IDEDMADrive1,3,01
HKR,,IDEDMADrive2,3,01
HKR,,IDEDMADrive3,3,01
Only add the bottom two lines (the bolded ones) if you have more than two IDE drives (HD/CD devices) connected to your system. Within the DISKDRV.INF file, add the same lines under the [DiskReg] entry. If the lines are already there, you don't need to continue on, because you are done. Otherwise, copy the two modified files to another directory (I recommend creating a new directory named inf2 in your windows system directory) and remove all of the items under the Hard Drive Controllers and all of the Hard Drives (only hard drives, not removable media) from under the Disk Drives heading. Then reboot your system. When the computer's Hardware Wizard pops up to reinstall the drives, set it so you can choose from the compatible drivers list and check the date on the drivers. They should be for the same day you modified them. If they are, great, use them, otherwise you will need to point them at the copies (the inf folder is invisible at this point, which is why you need the second copies) and use those. I grabbed the extra information about this tweak from Super7.net. Thanks guys!
Virtual Cache
From within the system applet you can also tweak your Hard Disk cache. Click on the File System button and it should default to the Hard Disk Tab. Set the "Typical Role of This Computer" to Network Server (no matter what your system actually is) and set the Read-Ahead Optimization to Full. The "Typical Role of This Computer" setting will later be changed by Cacheman anyway, but of the three generic settings, Network Server is the best option.
CAS Latency
CAS latency has to do with how fast your computer can access a column of data in your RAM. Generally the lower the number, the better. The problem is, most BIOSes don't allow the user to specify the CAS latency of their RAM (and this can be a big deal if you spend extra money on CAS 2 RAM). Once again, TweakBIOS can be used to play with this setting. If you have a lousy BIOS, this is definitely a program to invest in. Remember, though, if you set the CAS latency of a stick of RAM below what it's rated, it is effectively being overclocked, which could possibly cause some stability problems. Use the same system stability procedures that I outlined within How To Overclock guide (Part 1/Part 2) to make sure everything is stable.
Freeing Leaked RAM
Since the last update to this guide, we have received pre-compiled versions of the Vbasic scripts that we include within the guide. You can check out our little instruction manual and download the appropriate files here. If you would still like to use the old uncompiled scripts, here they are:
For 128 MB of RAM or less:
Mystring = Space(16000000)
For 128 MB of RAM or more:
Mystring = Space(80000000)
If you are using 128 MB of RAM, choose the one that works the best for you. To use the script, copy it into a text file and save it as memory.vbs (make sure that it doesn't have the .txt extension after it - you can do this by putting the filename in quotation marks). If your system begins to feel sluggish, close all of the programs you can and run this little program, and it should free up most of the RAM that is leaked out by bugs in Windows and the applications that you are running.
If you are having trouble running the script, make sure that the Visual Basic Runtime files are installed on your system. They are included in the Windows Scripting Wizard off of the Win98 CD and can also be found included with some downloaded applications.
Swap File - Virtual Memory Settings

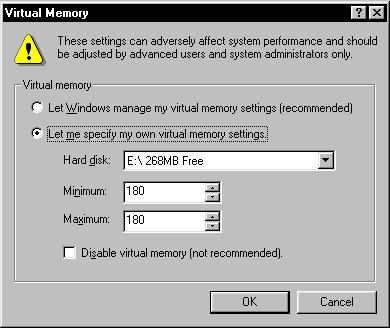
Begin by creating a permanent swap file on your hard drive. Go into the Control Panel / System applet and go to the performance tab. From there, click on the Virtual memory button and select the "Let me specify my own virtual memory settings" radio button. I personally recommend setting the size of the file between 128 and 256 Megabytes. Set both the Minimum and Maximum to the same value so that Windows doesn't spend time resizing the swap file. If you experience any problems (some games require a larger swap file), try increasing the size or setting it back to "Let Windows manage my virtual memory settings"
Defragmenting and Reorganizing your Files
Windows 98 includes a much-improved version of its Disk Defragmenter. In association with Intel (why, I don't know, but it is), they designed in a file reorganization technique that is quite similar (and almost as good) to the one in Norton Utilities and McAfee's Nuts and Bolts. Those programs are faster as well, but who cares, the one included in Windows 98 is FREE!
To run the Disk Defragmenter, click Start, Run, then type defrag. After that, instructions will appear on your screen.
To make sure file reorganization is on before you start defragmenting, click on the "Settings" button and check the "Reorganize program files so my programs start faster" box. Then run Disk Defragmenter as normal. I would recommend running Scandisk in standard mode on all the hard drives you intend on defragmenting before continuing - it will save time in the long run.
It doesn't hurt to defragment your drive often, but there's no reason to do it more than daily. If you really must have every bit of speed, defragment your hard drive(s) each night as you sleep (because it takes a bit of time).
VCache
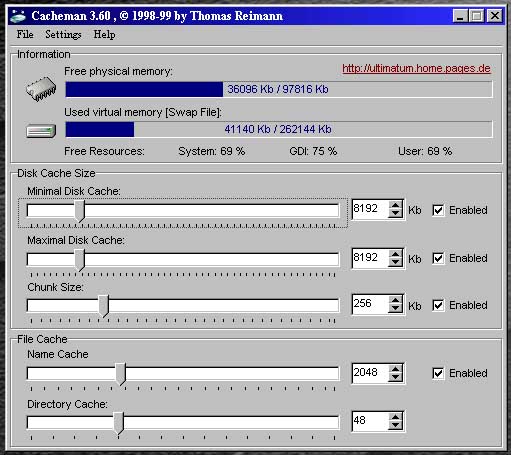
I used to do this by hand, but Outer Technologies created this great little program called Cacheman - it does the VCache stuff and more, so I will describe how to use it instead. It has several standard settings for many different types of computers (whether you have a low memory system or you mainly use it as a CD burner), but here are my personal favorite settings.

Min Cache Size 16384
Max Cache Size 16384
Chunk Size 256 or 512
Name Cache 2048
Directory Cache 48
Whichever setting you use for setting your VCache, set the Minimum setting up to the same level as the Maximum so that Windows doesn't waste time resizing the thing. After you have chosen your settings, go to the file menu and click save and you are done.
You can download the latest version of Cacheman here.
Hard Drives, RAM, and Overclocking
If you aren't overclocking your system, you can ignore the following section.
A great deal of the overclocking problems that many people run into aren't caused by the processor, but rather by the system's RAM and/or hard drive. RAM doesn't take kindly to being overclocked, and once you hit a specific bus speed, it is likely to fail. On top of that, it may not be able to handle other factors within the system, including 'noise' (electromagnetic noise, that is) and heat.
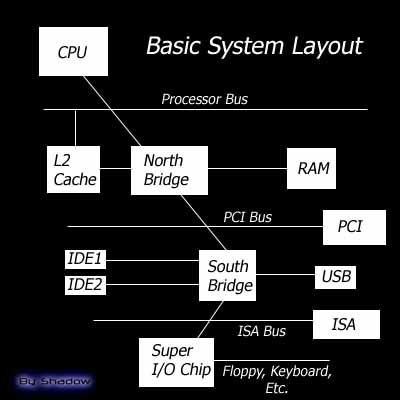
Another major cause of overclocking failure has to do with your hard drive and how it takes to the overclock. The following diagram should help explain the relationship:

All of the busses on the system are derived from either the system bus or the frequency crystal within the chipset. The IDE channel's frequency is at least in part dictated by the system and the PCI frequencies. When these two frequencies don't match up properly (a 33 MHz PCI bus cannot be derived from the system bus), it effects how the IDE channels transmit data - and the further away from 33 MHz the system goes, the greater the likelihood that any IDE drives connected to a system would fail as well.
| Bus Speed | PCI Speed |
| 66 MHz | 33 MHz |
| 75 MHz | 37 MHz |
| 83 MHz | 41 MHz |
| 100 MHz | 33 MHz |
| 112 MHz | 37 MHz |
| 124 MHz | 41 MHz |
| 133 MHz* | 44 or 33 MHz* |
*Depends on whether or not your motherboard supports the 1/4th PCI bus divider.
However, there is a way to lessen the impact that the non-standard bus speed has on your hard drive. Here are a few things to try:
- Cool your Hard Drive
- Disable UDMA and lower the PIO Mode settings from within your bios (4 is standard - it can go as low as 0)
- Disable DMA from within Windows
Conclusion
See how well these topics fit together? It's amazing, isn't it? I hope you get some use out of the guide revision - particularly the DMA fix; it really sped up my system. As always, feel free to email me with your comments and questions.
Want to return to the normal guide? Click here!
All Content Copyright ©Dan Kennedy; 1999


