For many, building a computer is scarier than working on a car. There are complicated components, lots of electricity, and the looming possibility that you may very well fry an expensive processor. There is something to be said for "working under the hood," though. It should be an entertaining process that, when finished, should invoke a feeling of pride. Think Da Vinci and the Mona Lisa or Enzo Ferrari and one of the most prestigious car manufacturers in the world. And with a little pricing research, a powerful machine can be built for an affordable sum.
Saving money isn’t the only benefit to building your own computer. In addition, you will acquire knowledge otherwise required for an upgrade further down the road. You’ll also get exactly what you want. For example, if gaming is important, splurge on a RADEON 9700 Pro and settle for a 60GB IDE drive rather than an expensive SCSI setup. Planning on using the PC as a home entertainment hub? Invest in a good sound card (Creative Labs and Hercules both make excellent units) and pick up a DVD drive.
Before you can sit down at your new computer desk though, you’ll need to actually build the system. Piecing a computer together may sound like a daunting task, but if you take a couple of precautions, there is nothing to worry about. I’ll be right here the whole time to ensure you don’t axe the power grid in your locale, but realize that I can’t give out my phone number so technical support is something you have to arrange. Most components include warranties and a toll-free number. If you suspect a particular piece of hardware is causing dissention in the ranks, don’t hesitate to ask for help.
Before We Begin
In order to ensure everything goes smoothly, gather a few important tools. A Philips head screwdriver is a must and needle-nosed pliers are often helpful. It doesn’t matter if your allegiance lies with the Pentium 4 or Athlon XP – buy quality thermal grease to keep the processor in contact with the heat sink. If you don’t have an anti-static wrist band, make a conscious effort to touch a ground point every so often (exposed metal on the case works fine) to keep electrostatic discharge from damaging any of your components. Finally, pour yourself a soda, pick up a towel (sweat and delicate hardware don’t mix), and clear some space on a desk or countertop.
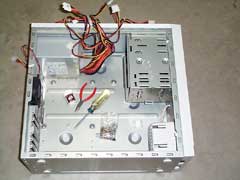
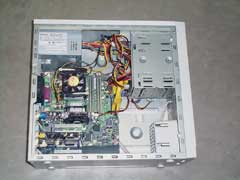
Like a doctor preparing for an operation, you need to make sure your case is ready to accept the innards of a computer. After opening the empty case (usually accomplished by removing two screws on one side), lay the case on its side, so the motherboard can be dropped into place. If the case includes screws and cables, take those out and set them aside. There should be a set of copper colored spacers in the bag of screws – we’ll use those to mount the motherboard above the metal plate on the side of the case. You may need to lay your motherboard down in the case to determine where the copper spacers are needed, but be extra careful – if you add a spacer that doesn’t correspond to a mounting hole in the motherboard, you risk a short-circuit.
Keep a set of gloves handy when you work on your case. You’d be surprised how sharp some of those components are.
Next, you’ll want to check the thin, metal plate towards the rear of the case that includes holes for the PS/2, serial, parallel, and USB ports. If it matches the configuration of your motherboard, you’re set.
If not, you’ll need to remove the plate by sliding it out. Again, be careful; the sides of the plate are sharp. Once the proper plate is in place, set the case aside for a moment and focus on the motherboard.
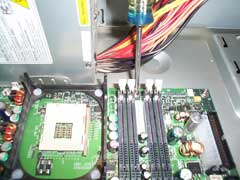
Working on a motherboard that has already been mounted can get tricky, so it is best to install the processor and memory before the board is installed in a case. Both the Pentium 4 and Athlon XP plug into a Zero Insertion Force (ZIF) socket, so there should be no reason to apply pressure when installing the processor. First, lift the arm adjacent to the socket. Then align the processor with the socket according to the pattern of pins on the socket interface. There is only one way the processor will fit, so again, do not apply pressure while inserting the chip. Finally, close the arm, securing the processor on the motherboard. Now, using the thermal grease mentioned previously, apply a thin film over the processor’s core.
Please note that the next step will be different for Pentium 4 and Athlon XP owners.
Tweak Tip!
Double-check the processor’s fan connection – an Athlon processor will burn up within seconds if it isn’t cooled actively.
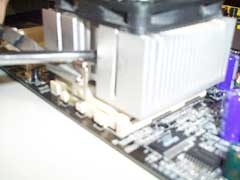
If you purchased a retail Pentium 4 processor, you will find that the included heat sink fits over the processor and into what Intel likes to call the Heat Sink Retention Mechanism (a fancy name for the plastic clips keeping the heat sink from succumbing to gravity). Make sure all four corners snap firmly into place, and then pull the opposing levers to tighten the heat sink onto the processor. Be sure to connect the fan’s three-pin power connector to a header on the motherboard.
The process isn’t nearly as graceful for Athlon XP owners. In fact, be forewarned that the processor core is sensitive to pressure, so if you feel you may be pushing too hard to affix the heat sink, take a quick break to re-evaluate your strength, tough guy. There is only one way that a Socket A heat sink should fit, so be sure that the larger end of the socket aligns with the cut-out section of the heat sink. One end will clip easily onto the motherboard, while the other will require more persuasive coercion. In the following illustration, I’ve demonstrated my favorite technique for attaching a heat sink. Use a screwdriver to push down on the clip while pulling outwards with a set of pliers.
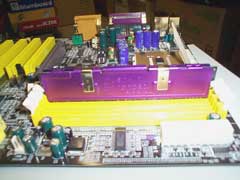
Be sure not to mix memory types. PC2700 DDR RAM does little good alongside PC1600 RAM.
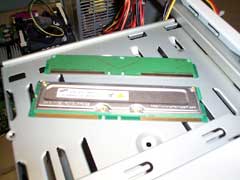
Depending on what type of motherboard you’ve got, there may be some variation in how memory is installed. Still, there are a few general rules of thumb you’ll want to abide by. First, don’t immerse the modules in water. Second, pay close attention to the type of RAM supported by your motherboard. Some boards support both PC133 and DDR memory, but the majority is constrained to a single standard. If DDR is your poison of choice, note that the modules will only fit into the 184-pin slots one way. Boards that support 16-bit RDRAM require that two modules be used at a time. If the board has four slots and you’ve only got two modules, be sure that the remaining two are terminated with a CRIMM module (usually included with i850 motherboards). The installation process itself is simple: pull the plastic clips on each end of the slot, inset the module according to the slot’s keying, and apply equal force to the entire module until it clicks into place. Repeat, if necessary.
"The Big Blue Banana" is an even mixture of Pepsi Blue and Cruzan’s Banana Rum, invented by Chris.
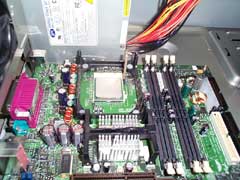
Since the motherboard now houses a processor and memory, it can be installed in the already-been-prepped case. Line up the mounting holes with the copper spacers and use the included screws to mount the board. Now that your custom machine is taking shape, it may be a good time to step back for a break. Relax, meditate, take some pictures, watch Friends, or have a Big Blue Banana.
When you’ve finished installing your cables, tuck them in the unused drive bays for a clean installation.
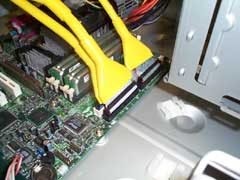
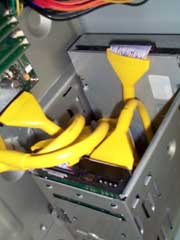
Most motherboards include two IDE cables and a floppy drive connector. While the interior of the case is still clean (thus reasonably accessible), attach the cables to the motherboard. Note that one end of the cable has two connectors close together – this end attaches to your IDE device of choice, while the other end goes to the motherboard. Each cable should be marked with a red wire to indicate Pin 1. It is imperative to match Pin 1 on the cable with Pin 1 on the motherboard and again with Pin 1 on the hard disk drive or CD-ROM.
Conventional IDE cables are fine for the most part, but in the interest of cleanliness, we’ve developed a soft spot for round cables. Not only do these cables take up less room, but they are also easier to tuck away, promoting better air flow throughout your case.
Step Six: Install Your Media
With the cables out of the way, you can now install your hard disk drive, CD-ROM drive and floppy disk drive. First, you’ll want to make sure each drive is designated as a ‘master’ or ‘slave’ drive using the jumpers on the back of each drive. If you’ve got one hard drive and one CD-ROM, you’ll see the best performance from both devices if each is installed onto its own channel. In that case, both drives can be set as ‘masters.’ With the addition of a CD-RW drive, you would want to assign one drive as a ‘master’ and one as a ‘slave,’ leaving the hard drive on its own channel.
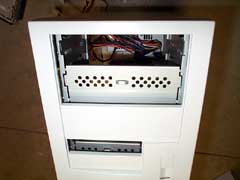
Now, you’re ready to add a CD-ROM drive. You may have a metal panel preventing you from inserting the drive into a 5.25" slot. If so, remove the panel by rocking it back and forth until it comes loose. If your case uses rails, attach them to the drive and slide it into the chassis. Otherwise, use the included screws to secure the drive.
The floppy drive can be installed using the same method, only use one of the external 3.5" inch bays. Attach the appropriate cable and secure the drive using the same small screws.
Tweak Tip!
If you are interested in video editing, consider a SCSI setup or IDE RAID. You’ll notice the performance difference almost instantly.
Finally, install your hard disk drive in an internal 3.5" bay. Many cases sport detachable disk drive bays that often ease installation, but if we were really looking for the easy way out, we would have picked up a G4 Cube. Attach the ends of each cable to the corresponding drive. For instance, the end of the primary IDE cable should run to the hard drive. Similarly, the end of the secondary cable should go to the secondary ‘master’ drive, while the second connector attaches to the secondary ‘slave.’
Before installing a video card, make sure all memory slots are closed. I’ve broken more than one DIMM slot by aggressively installing video cards.
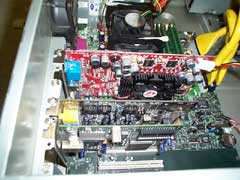
Expansion cards add capabilities beyond what integrated sound and graphics can do. Additionally, you can buy cards that add SCSI, USB 2.0, Gigabit networking – even cable television support!
Unless your new system is to be used exclusively for business, it’s a safe bet that a new graphics card will find its way into your AGP slot (the brown one in the middle of the motherboard). Nowadays, graphics cards are cooled by heat sinks and fans, much like processors. It should come as no surprise, then, that high-end cards generate lots of heat. When I build a computer, I typically leave the white PCI slot closest to the video card empty for plenty of air flow. Installing the card itself is a snap – position the card over the slot and push down gently until it is fully inserted. Use one of the screws included with the case to secure the card to the chassis. Use the same procedure to install each of your other cards. If you haven’t yet purchased them, consider an upgraded sound card and network card, at the least.
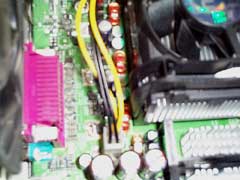
If your LEDs don’t light up right away, reverse them on the motherboard. It is entirely possible that you’ve installed them backwards.
In order for your computer to turn on when you hit the power button, you need to connect the switches and light emitting diodes (LEDs) from your case to the motherboard. The connectors themselves are usually labeled, but it can be a little harder to locate the pins on the motherboard. Your best source for this data is the manual included with the board. Once you have the connectors, well, connected, we can move on to the next step. Don’t worry; we’ll test the lights and switches a little later.
Step Nine: Scottie, Power Please?
Tweak Tip!
The ATI RADEON 9700 Pro is very sensitive to power supply quality. Our 400W Antec unit would not function with the card, while our 350W Sparkle unit works great.
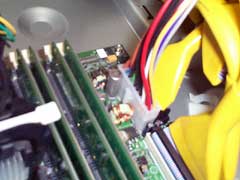
We’ve waited a long time for this – simply, I have no desire to play with hardware actively fed by an electrical socket. I have no desire to look like Carrot Top, so I never add power until I’m done under the proverbial hood. We’re pretty much done though, so go ahead and connect the large 4-pin power connectors to the hard disk drive and CD-ROM drive. The small 4-pin Molex connector is required for the floppy disk drive.
If you’ve got a Pentium 4 processor, not only will you need to connect the ATX power connector, but you’ll also require a 4-pin 12V auxiliary connector. Athlon XP-compatible motherboards only need power from the standard ATX connector. At this point, feel free to connect the case’s power supply to a wall socket.
Before you put the cover back on the case, it would be wise to test the machine. Connect a keyboard and mouse to the motherboard and a display to the video card. Press the power button and immediately hit the ‘Delete’ key to enter the motherboard’s BIOS. Check the front of the case to ensure both the power and hard drive lights are functioning (you will probably need disk activity before you can check the hard drive LED). Eject the CD-ROM tray to check power to the drive. Finally, check the BIOS to make sure the drives are configured as you originally intended. This, unfortunately, is where we part ways – for tips on configuring your BIOS, reference your motherboard’s manual.
Hopefully you haven’t electrocuted yourself, or worse yet, fried a new RADEON 9700 Pro video card. I think you’d agree that building a new computer is a learning experience, regardless if it’s your first time or fiftieth. There is always something that can go wrong, and if you build new machines for long enough, anything and everything will happen. If things don’t go your way the first time, be patient and troubleshoot the problem. Remember, "Do or do not, there is no try."