How Monitors Work
Posted: May 28, 2000
Written by: Tuan "Solace" Nguyen
Introduction
Here we are again, tackling yet another mystery to many of us. Last time I talked about how optical devices work. I hope that helped many of you out and cleared up questions you may have had.
Today we're going to be talking about one of the most fundamental components of your computer system -- the monitor.
You've been staring at it day in and day out, and it has displayed everything for you from spreadsheets, to games, to other unmentionables. How does the monitor display pictures and move images? Well, it might interest you to know that the basics of the monitor were developed well over a century ago.
But, like always, let's start from the ground up, or rather, from the back to the front.
Shoot Me
Did you know that right now, as you're reading this article, there's a loaded, triple barrel gun sitting right in front of you blasting away?

At the heart of your monitor, is the CRT or cathode-ray tube. And inside this assembly (at the back of your monitor) is an electron gun. A cathode, is a cell that sheds electrons when electrical current is applied. The cathodes rise in temperature all the way up to a scorching 800 degrees Celsius. They shed their electrons which are then gathered by a grid and focused into the gun chamber. Inside the chamber are three guns, one for each color -- red, green and blue. After the electrons are gathered and begin traveling through the tubular chamber, harnesses throughout the chamber (with electromagnetic fields) accelerate the electrons, these are the elliptical aperture lenses..

This entire assembly is housed inside a vacuum chamber. This is the only way the electrons will be emitted without any material interference.
Pushing and Pulling
After the gun lies what is called the deflection yoke. The deflection yoke controls the electron beams. The yoke has four electromagnets placed equal distances from each other. The yoke can manipulate the beams, pulling and pushing it to light up areas on the phosphorous screen. The yoke actually pulls the beams from left to right on the screen in a sweeping motion. The speed at which this happens is about 50,000 mph - yes, fifty thousand miles per hour.
This process occurs from the upper most left pixel to the bottom most right pixel on the screen. Then the process occurs over again, starting from the top left.
The yoke actually controls varying intensities of the beams while another device control the sweeping motion. The flyback transformer is the device which controls this motion and is composed of winding wires of copper. A low power signal is applied to the flyback transformer's magnetic coil, which creates a magnetic field. When the power source is switched off, the magnetic energy is discharged into a high power output. This output is then transferred to the yolk and provides the power it needs to create the magnetic field used to manipulate the electron beam. When one line on the screen is completely drawn, the transformer discharges. This actually shuts off the electron gun, and the yolk's magnetic field dissipates. The beams then return to the other side of the screen, drop down to the next line and start the process all over again.
Once it has completed the process, the electron beam strikes a phosphorous screen on your monitor. Phosphors glow when hit by electrons. The greater the beam intensity, the brighter the phosphors glow. However, as more energy is shot at the phosphors, they tend to lose brightness over time.
Each line, or row of pixels, is called a raster. If you screen is set to 640x480, you have 480 raster lines. If you're up at 1280x1024, you have 1024 raster lines. Each line contains pixels. For 1024 raster lines, you have 1280 pixels, which gives you the resolution 1280x1024. The speed at which each raster line is drawn is called the horizontal sync. Once a frame has completely been drawn, this is called a refresh. Each pixel only lights up for a split second. Therefore the more raster lines there are to draw, the more quickly the screen has to be drawn in order to keep a constant image. This is called a refresh rate or vertical sync. If your screen is set to 100Hz, this means that the screen is redrawn 100 times a second. Rates 75Hz and above are considered to be less stressful on your eyes. Anything lower and you get that annoying flicker effect. It's easy to detect this by looking off the screen to one side.
Refresh Me
A monitor's pixels are aligned in a fixed grid. Let's say you purchase a high-end monitor that can do a maximum resolution of 1600x1200 (the usual for 19" displays and up), then the monitor contains 1,920,000 pixels. Take the primary trio number -- in this case 1600, and multiply it by the number of raster lines, 1200 and you get 1,920,000 pixels. No monitor can scale to a higher number of pixels, meaning a higher resolution than the physical number of pixels that the screen contains.
Now, when you set your screen to 640x480, you're asking your monitor to resolve 307,200 pixels. Virtually every monitor nowadays can do this, no questions asked. However, once you start entering resolutions like 1280x1024 and above, you're asking your monitor to work harder because it has to hit more pixels -- meaning the beam has to draw more pixels, therefore each frame is drawn slower. Each refresh now takes much longer than before when the screen was only at 640x480. Make sure the monitor you're interested in can do fast refresh rates at high resolutions -- preferably 85Hz at 1280x1024 or 80Hz at 1280x1024 minimum.
Pixel Matrix
Each individual pixel on the screen is made up of 3 dots -- red, green and blue (RGB). By controlling the intensity on each specific beam, it is possible to create the entire spectrum of colors. If one pixel needs to be purple, the guns will intensify the blue and red phosphor dots. The beam intensity can be changed to adjust tone of color, contrast and brightness.
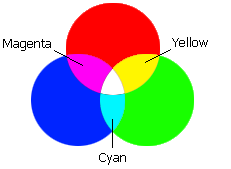
But what if the light from one pixel leaks onto another pixel or the beam crosses pixel? Then you get a nasty blurry image with color tears. How do manufacturers prevent this? They use masking technology.
Invar Shadow Mask
Masking technology is used to prevent the a pixel's glow from leaking over to another pixel -- producing off-color images and blurriness. The most common type of mask is the Invar shadow mask. The Invar part is a type of metal alloy that has a virtually zero expansion factor when heated -- you don't want your holes getting larger and smaller. And besides, frequent expansion and contraction over time causes cracks.
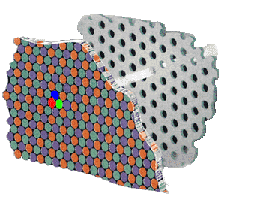
The shadow mask is basically a thin layer of metal alloy with thousands upon thousands of perforated holes. These holes align with the pixels on the phosphorous screen. The mask assures that the electron beam strikes its intended pixel and no other at the same time.
There are drawbacks to using shadow mask technology. Over time, the mask will curve because of the constant heating and cooling from the electron beam. Because of this, images will eventually become blurry at the corners. This is why a nickel/iron mixture called Invar is used. Another drawback of shadow masks are that they are curved at the corners to compensate for the beam sweep or a warped image will appear. This is why "perfect flats" are never based on shadow masks.
Aperture Grille
Aperture grille technology has the same intentions as shadow masks, to prevent pixel glow leakage. The technology is made up of thousands of thin vertical metal alloys wires that run horizontally across the screen. The phosphor screen itself runs in stripes along with the grille.
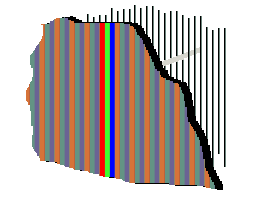
This has the same effect as shadow masks but because there is less resistive material, the resulting image has higher contrast and brightness and gives overall better color vibrancy than shadow masks. But because the actual RGB phosphor strips themselves do not have interruptions like shadow masks, the sharpness of the electron beam itself must define the top and bottom of each pixel. Some say this causes blurriness but currently at 0.22mm dot pitch, aperture grille has the sharpest visuals of the two technologies.
Another advantage aperture grilles have over shadow masks is that they only need to be curved horizontally instead of both planes. However, all this comes at a price. Each grille wire is stretched vertically very tightly to ensure that wire "shimmering" doesn't occur and that a sharp image is produced. But when the wires heat up from the beam, they expand and slack -- loosen a bit. This contracting and expanding causes a severe wave or vibration effect. To counter this, aperture grille displays employ damper wires that keep the grille wires from moving. There are two damper wires to every aperture grille display. And because of this, they are noticeable when a light color is being displayed. If you have a Trinitron based display, you probably have already noticed two faint lines running across your screen, dividing the screen into three.
While this can be an annoyance, it really depends on for what you're using your monitor. If you're an AutoCAD user, you may find the lines very distracting when doing precise drawings. However, if you're just into rapping people with your rail gun, then the lines should pose no problems at all. Some people actually like the lines saying that it gives them the "aperture class". I don't know if this is actually a good thing to boast about but, what can I say?
Your Best Pitch
You often hear companies refer to the sharpness of their monitors in "dot-pitch". This is the measurement of how close each pixel is to another -- the closer they are, the sharper the resulting image. When comparing dot-pitch, you must consider which technology the monitor is based on -- aperture grille or shadow mask. Each technology has its own way of defining dot-pitch.
Your Best Pitch (cont.)
For a shadow mask display, dot-pitch is measured horizontally because the RGB dots lie in a triangular layout (refer to images back on page 3). When you see a shadow mask display boasting a dot-pitch, multiply it by 0.866 because the horizontal distance between the next same color dot is 0.866 times the dot-pitch. Because of this, you should multiply the same number for aperture grille pitch to get a fair result for both technologies.
The most common pitches lie between 0.26 and 0.28. Recent innovations have taken the dot-pitch all the way down to 0.22.
Visual sharpness is not completely defined by dot-pitch alone; there are many anomalies that can cause an image to lose its sharpness.
Geometric Distortion: This occurs when squares and circles don't appear as they are supposed to. A perfect circle can appear slightly oval on the edge of the screen because of curve. This is caused by the intensity of the beam and the angle it is coming from. This can be explained by using a flashlight. Take a flashlight, sit at one spot in the room and shine it straight at a wall. Now, slowly move the beam to one side of the wall and the original circle dot won't appear so circle like anymore. This is the concept of geometric distortion.
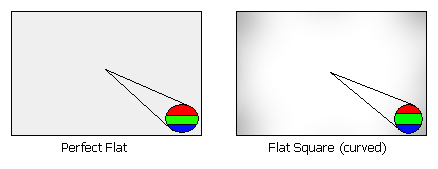
Now, considering that the wall is flat, if the edges of the wall were to curve in towards the light source, then it would be like aiming the beam at the center -- producing an accurate dot. This is the way "perfect flats" tend to very slightly warp an object at the far corners (hardly noticeably). This is all correctable with onboard beam processing but it is never perfect unless you are using an LCD (liquid crystal displays -- the displays that laptop use, and recently, desktops).
Ghosting: This occurs when one pixel's glow leaks onto another pixel. This causes the image to seem slightly faded or winded to one side. This can be extremely annoying when viewing text or sharp and precise schematic diagrams.
Misconvergence: This occurs when the three electron guns (RGB) misalign with each other on a specific pixel. The intention is to have all three beams strike a pixel at the same time. But sometimes this doesn't always happen and you may get colours that bleed onto other colours or edges that are not so sharp.
Conclusion
Hopefully everything you've just read about how a monitor works will go a long way in helping you on your next purchase. Remember, long after your nice Pentium III or Athlon becomes your favorite doorstop, your monitor will likely still be with you providing thousands of hours of visual splendor (depending on the one you get.. hehe). So invest in a good monitor, one that will serve you well into the future. Or, perhaps you're now more interested in those flat LCD displays that burns holes in wallets. Want to know how they work? Tune in next time… :)
Want to return to the normal guide? Click here!
All Content Copyright ©Dan Kennedy; 1998-2000