GeForce2 MX Overclocking Guide
Posted: November 19, 2000
Written by: Tuan "Solace" Nguyen
Introduction
There are certain things in life that you just have to lay down a mountain of cash for... This is true if you want to purchase a luxury car to drive, or a nice house to live in. Thankfully, not everything in life requires tons of money to be enjoyed. Case in point, the NVIDIA GeForce2 MX.

Architecture
The MX is still based on the GeForce2 card and it shares the same features as the GTS. However, the core speed of the GPU has been reduced from 200MHz to 175MHz. But that’s not where the reduction ends. The memory bandwidth has also been reduced. The original GTS cards uses DDR (Double Data Rate) SDRAM to help keep data flowing without congestion. With the MX series, NVIDIA has declared that they will use SDR (Single Data Rate) SDRAM. This dramatically reduces overall performance of board. The point of this guide is to bring back some of that performance to the GeForce2 MX.
The GeForce2 MX to the GTS is like the Duron to the Thunderbird and like Celeron to Pentium III. Does this mean that the MX is a poor performer? Far from it. People who have Celerons and Durons know first hand that their processors can wipe the floor clean along with the fastest processors out there.
Right now, the fastest card out there is the GeForce2 Ultra. It is the pinnacle of speed! For now at least. But are there really other alternatives for gamers on a budget? Or perhaps you’re not on a budget at all but you’re a person who spends your money to its fullest potential. Whatever the reason, there is no reason not to consider the GeForce2 MX. But if you're reading this guide, you probably already own a GeForce2 MX, right?
Let’s take a look at our card’s specs, before we tweak it out:
Specs
0.18 micron manufacturing process
175MHz core clock
166MHz memory clock
2 pixels per clock cycle
350 Mpixels/s fill rate
4 texels per clock cycle
700 Mtexels/s fill rate
2.8 GB/s memory bandwidth
20 million triangles/sec
128-bit Single Data Rate (SDR) or 64-bit Double Data Rate (DDR) memory
350MHz RAMDAC
Digital Vibrancy control
NVIDIA Shading Rasterizer (NSR)
TwinView Technology
High-Definition Video Processor (HDVP)
AGP 4X with Fast Writes
32-bit color
32-bit Z/stencil buffer
Cube environment mapping
DirectX and S3 texture compression
Limitation
The most limiting factor of any GeForce2 MX card is the type of memory it uses -- low speed SDR (single data rate) SDRAM. The memory just doesn’t have enough bandwidth to keep data flowing smoothly. The GeForce2 MX pumps too much information to be stuffed down an SDR pipeline. Since we now know that MX cards inherently use SDR SDRAM, we’re going to have to find another way to improve bandwidth. There’s only one-way -- overclock the RAM.
Let's take a look at our card.
The Card
Full Frontal (Click for a bigger size picture)
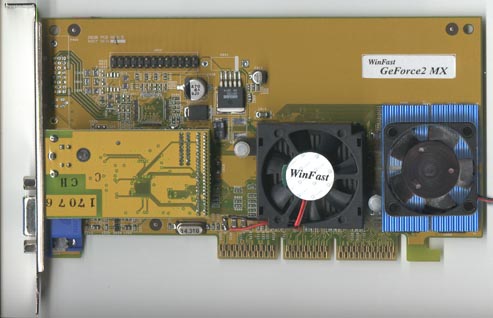
For our tests, we chose to go with Leadtek’s version of the GeForce2 MX because it comes with an active heatsink instead of dinky little passive ones. This should help us pull a few extra MHz from the core. In theory though, overclocking the core should yield almost no performance increases because of the memory bandwidth limitation. You’ll also notice that I’ve taken the RAM-sinks off of the Hercules Prophet II GTS and stuck them on the memory modules of this card. Also, I figured I would jam in a little fan there just for some added cooling. I used some really sticky thermal joint compound from Wakefield Engineering and simply stuck the HSF on. I also used a little super glue to glue down the four corners of the fan to the heatsinks.
Let’s move on to actually overclocking this baby...
Overclocking
We’re using Detonator 6.35 for the MX and enabled the overclocking tab via the Coolbits registry add-on.
After a bit of tweaking we managed to get our core to reach 210MHz and our memory to reach an incredible 215MHz! Here’s a chart showing how everything works out:

Taking a look at memory performance, going from 166MHz to 215Mhz gives us more than a 200Mtexels/sec increase! That’s performance! As for the core, there really isn’t that much of an improvement. If you take a look at default core speed and the default memory speed for Mtexels, you’ll notice that the maximum rate the memory can handle is below the maximum fill that the core can dish out. There’s the bottleneck everyone’s talking about. With the overclocked memory, there’s about 160Mtexel/sec of extra bandwidth. That’s just perfect for getting the GeForce2 MX GPU to perform at its limits.
To get a Mpixel/sec rating you take the speed and you multiply it by 2 (2 pixels per clock cycle). For Mtexels you multiply by 4 (4 texels per clock cycle).
Even with an overclocked core, we still have enough headroom to spare. Here's how we actually overclocked it.
Overclocking
To overclock your video card, you have to make sure that it has sufficient cooling. Our Leadtek card comes with a heatsink/fan combo on the GPU so we don’t have to worry about overheating the core. However, we know that the GeForce2 MX is plagued by low memory bandwidth; so overclocking the core isn’t what we’re going after. What we have to target is the memory. You can either use the method I’ve used, which is using small heatsinks and sticking them onto the RAM modules themselves or make sure the ambient temperature surrounding the modules is really cool.
If you decide to use heatsinks, make sure they cover the entire module. There isn’t enough space to screw heatsinks into the board so you’ll have to glue them on. I used non-conductive epoxy glue and just stuck the heatsinks on that way. Some of you may want to use heatsink compound but you’ll have to make sure that the compound has enough adhesion to keep the little heatsinks attached. You want to avoid them falling off and short-circuiting another expansion card or your motherboard.
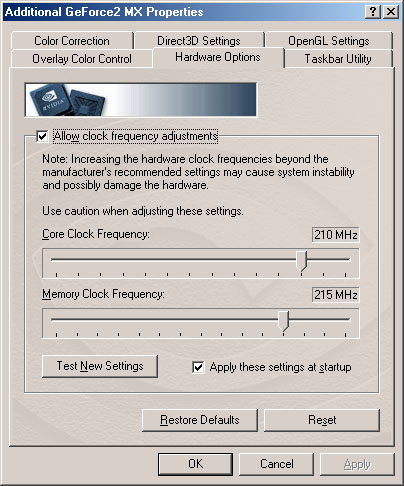
Above is a shot of our MX card operating at 210/215. We experienced no visual corruption whatsoever, even during intense gaming. Some of you may be wondering where the Hardware Options tab is in your GeForce2 properties. By default, it is not displayed, but you can either edit your registry or download a little file called Coolbits, you can find floating around the net. But since I’m such a nice guy I’ll provide you with the Coolbits link here.
Once you have downloaded it, all you have to do is double click on the file and press “Yes” when it asks if you want to incorporate the file into your registry. Once that’s done, just go back into your GeForce2 properties and you should have the Hardware Options tab.
From the tab you can adjust core and memory frequency to your liking. Make sure you start off slowly and keep moving slowly. Testing each setting as you go along to make sure the card is stable. You don’t want to jump all the way to the top of the scale right away. Eventually you’ll hit a point where the card will not be stable. At this point it’s time to lower the speed. Continue to lower the speed of either the memory or core or both until you reach stability. That will be your card’s optimal setting. Don’t expect to hit our speeds though. Your results may vary. You may be able to go higher or you won’t. Each card is different.
Risks
The risks associated with overclocking a video card are slim. When you may experience if you overclock too high is white sparkles when you’re playing a game or the system will just freeze. All you have to do is reboot and your settings should be restored. If they are not, you can boot into Safe Mode and reinstall the drivers, this way your overclocking settings will be discarded. You can’t actually fry the components if they are adequately cooled. Even though I’m telling you that there are virtually no risks, neither Tweak3D nor I will be responsible should something happen to your card. Also, overclocking your card voids your warranty with the manufacturer and vendor from which you purchased.
Let's get to some numbers shall we?
Benchmark System
AMD “Thunderbird” Athlon 1GHz
Asus A7V rev. 1.01, BIOS 1002
512MB Infineon PC133 SDRAM Cas2
Leadtek WinFast MX (32MB) with NVIDIA Detonator 3 (6.35) reference drivers
-- Default Core (175MHz) and Default Memory (166MHz)
-- Overclocked Core (210MHz) and Overclocked Memory (215MHz)
IBM GXP75 Ultra100 HD
Windows 98 SE
3Dmark2000
800x600 @ 16/32bpps
1024x768 @ 16/32bpps
1280x1024 @ 16/32bpps
Quake 3 Arena with latest Point Release
Demo 1 & 2: Normal and High Quality
1024x768
1280x1024
1600x1200
Unreal Tournament 4.32
1024x768
1280x1024
1600x1200
What do you think of our testbed system? Not bad for testing the latest technology, huh? I busted out some big dough to get it so you better like my guide. :)
3DMark2000

Here we see that with a core speed of 210MHz and a memory speed of 215MHz, the GeForce2 MX performs very well, with an average of 7% to 8% improvement. This is very respectable. It might also interest you to know that overclocking the core alone didn’t give us much of an improvement. The memory was the determining factor in performance.
The GeForce2 MX performs much better with faster memory. There’s no doubt about it. And this goes for the entire GeForce family, too.

Here we see an incredible performance gain from improved memory speeds. Obviously core speed isn’t everything. Bandwidth is almost everything.
We see the same trends and same improvements across the entire spectrum. We’re getting impressed! Since 3Dmark2000 is somewhat synthetic, let’s take a look at what some real world gaming performance might look like.
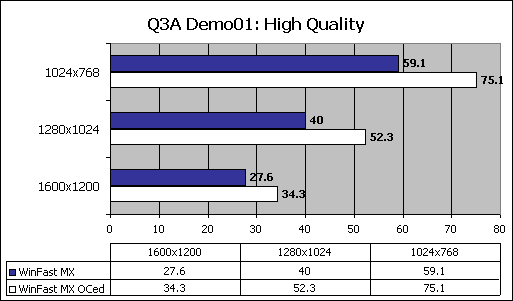
Quake 3 Arena with Latest Point Release
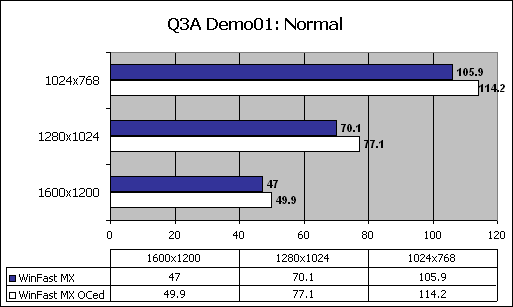
Check out the scores at 1024x768! We think that 1024 and 1280 are the two favorable resolutions to play at using the GeForce2 MX. Memory! Memory! The WinFast MX comes with 6ns SDRAM. Think of what we could do with 5.5ns SDRAM from the likes of Hercules and its 3D Prophet II MX. Stick some fans and sinks onto the card and start smoking!
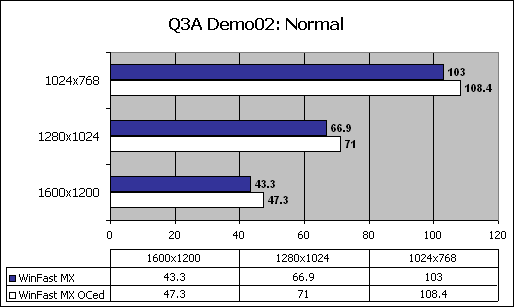
The same types of improvements are seen here. There isn’t much of a difference between Demo01 and Demo02 but we put it in for some variation and randomness.
Let’s take a look at Quake 3 in High Quality mode.
Quake 3 Arena with Latest Point Release (cont.)
As the resolution goes higher, the improvements lessen because of memory bandwidth, but you probably won’t be playing at 1600x1200 with a GeForce2 MX -- at least not with Quake 3. Perhaps other games like real-time strategies and RPGs will do well with these very high resolutions. Quake 3, however, should stick with 1024x768 for High Quality. 75.1FPS is very playable at 1024.
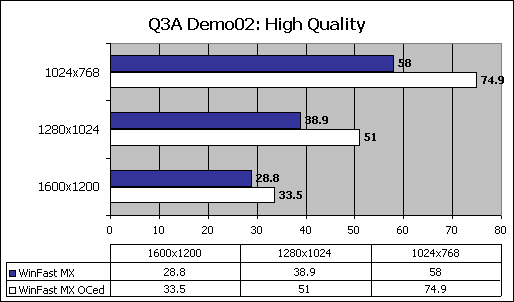
With Demo02 we see the same trends. The same improvements are seen all around. Extremely favorable scores, wouldn’t you say?
Let’s take a look at Unreal Tournament.
Unreal Tournament 4.32
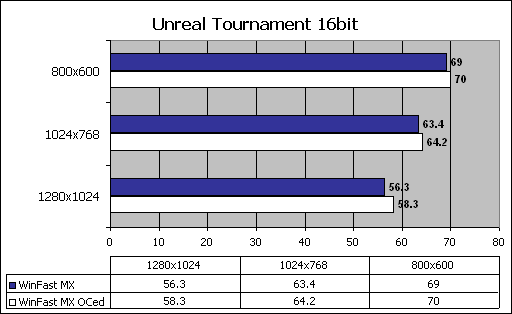
Now before you go asking what happened to the massive improvements, remember (from past benchmarks) that Unreal Tournament seems to be more CPU intensive than graphics intensive. Quake 3 packs more visual punches than UT, yet is able to put out faster frame rates than UT. This is proof that UT isn’t a very good judge for frame rate speed with Direct3D. But we included it anyway, just so you can see the type of play you can achieve.

We notice that when UT is switched into 32bit mode, not much of a performance hit is taken until 1280x1024. Up until 1280x1024, the CPU determines almost all performance points. However, when switching from 16bit to 32bit in 1280x1024 (and above), performance takes a big nosedive.
Try sticking to lower resolutions for UT if you don’t have a burly CPU and graphics card.
Analysis
Did you see those scores people? If you weren’t thoroughly impressed by the performance gains, then I don’t know what to say. But I’m sure you are, because I am! Increasing memory speeds did a lot for the WinFast MX. We saw performance increases in the area of 7% to 13% improvement on average!
Take a look at the average price for any GeForce2 MX card without all the TwinView bells and whistles. As of this writing, you’ll find them for an average selling price of $129USD. That’s a great bargain for what you’re getting in return. You’re getting the latest GPU architecture from NVIDIA for last year’s card’s price -- or even less.
Is the GeForce2 MX a fabulous chip? It sure is. I’m already using them in my other systems and I must say they are real fast. Forget all the things you’ve might of heard about how they are value end cards and don’t have enough horsepower to play in the big leagues. The proof is right in front of you. If you’re a serious gamer, you’d go for one of these babies.
Conclusion
It was fun adding some stuff to our Leadtek WinFast MX. It’s a cool feeling to add your own gimmicks to a card knowing that you’re the one who’s doing the technology improvements. The GeForce2 MX is a great GPU, and one that won’t rip a hole in your wallet. Pick one up for cheap, bring it home, slap on some heatsinks or a fan or both and start churning up the speed.
What you come out with is a card that kicks serious butt and you realize you have more than what you paid for -- unless you were ripped off by some evil vendor. You can find a GeForce2 MX based card for as low as $110USD!
The GeForce2 MX is a great overclocker. Period. Hope you’ve enjoyed reading. Feel free to email me here or visit me in the Tweak3D channel on Undernet: #tweak3d
Thanks for reading.
Want to return to the normal guide? Click here!
All Content Copyright ©Dan Kennedy; 1998-2000
